How It All Connects
This is the real architecture. No sugar-coating. Here is exactly how OpenClaw, the DJI Mavic Air 1, COLMAP, and Three.js wire together to create an autonomous 3D scanning pipeline.
User Interface
Telegram BotUser sends natural language commands via Telegram. Example: 'Scan my apartment for Airbnb listing.'
AI Orchestrator
OpenClaw + ChatGPT (Codex 5.1)OpenClaw receives the message, uses ChatGPT to parse intent, extract parameters (room type, purpose), and triggers the appropriate scanning tool.
Drone Control
DJI Mavic Air 1 + Litchi AppPre-programmed waypoint mission executed via Litchi or DJI Fly. The drone follows a grid pattern at 1.5m altitude, capturing images at each waypoint.
Image Capture
50-100 High-Res PhotosDrone camera captures overlapping images at calculated angles. 70% overlap between adjacent shots ensures photogrammetry accuracy.
3D Reconstruction
COLMAP / OpenDroneMapStructure from Motion (SfM) algorithm matches features across images, triangulates camera positions, and generates a dense 3D point cloud.
3D Visualization
Three.js / Potree WebGLPoint cloud rendered in an interactive web viewer. Users can orbit, zoom, and explore the 3D model. Link shared back via Telegram.
Pre-Programmed Flight Path
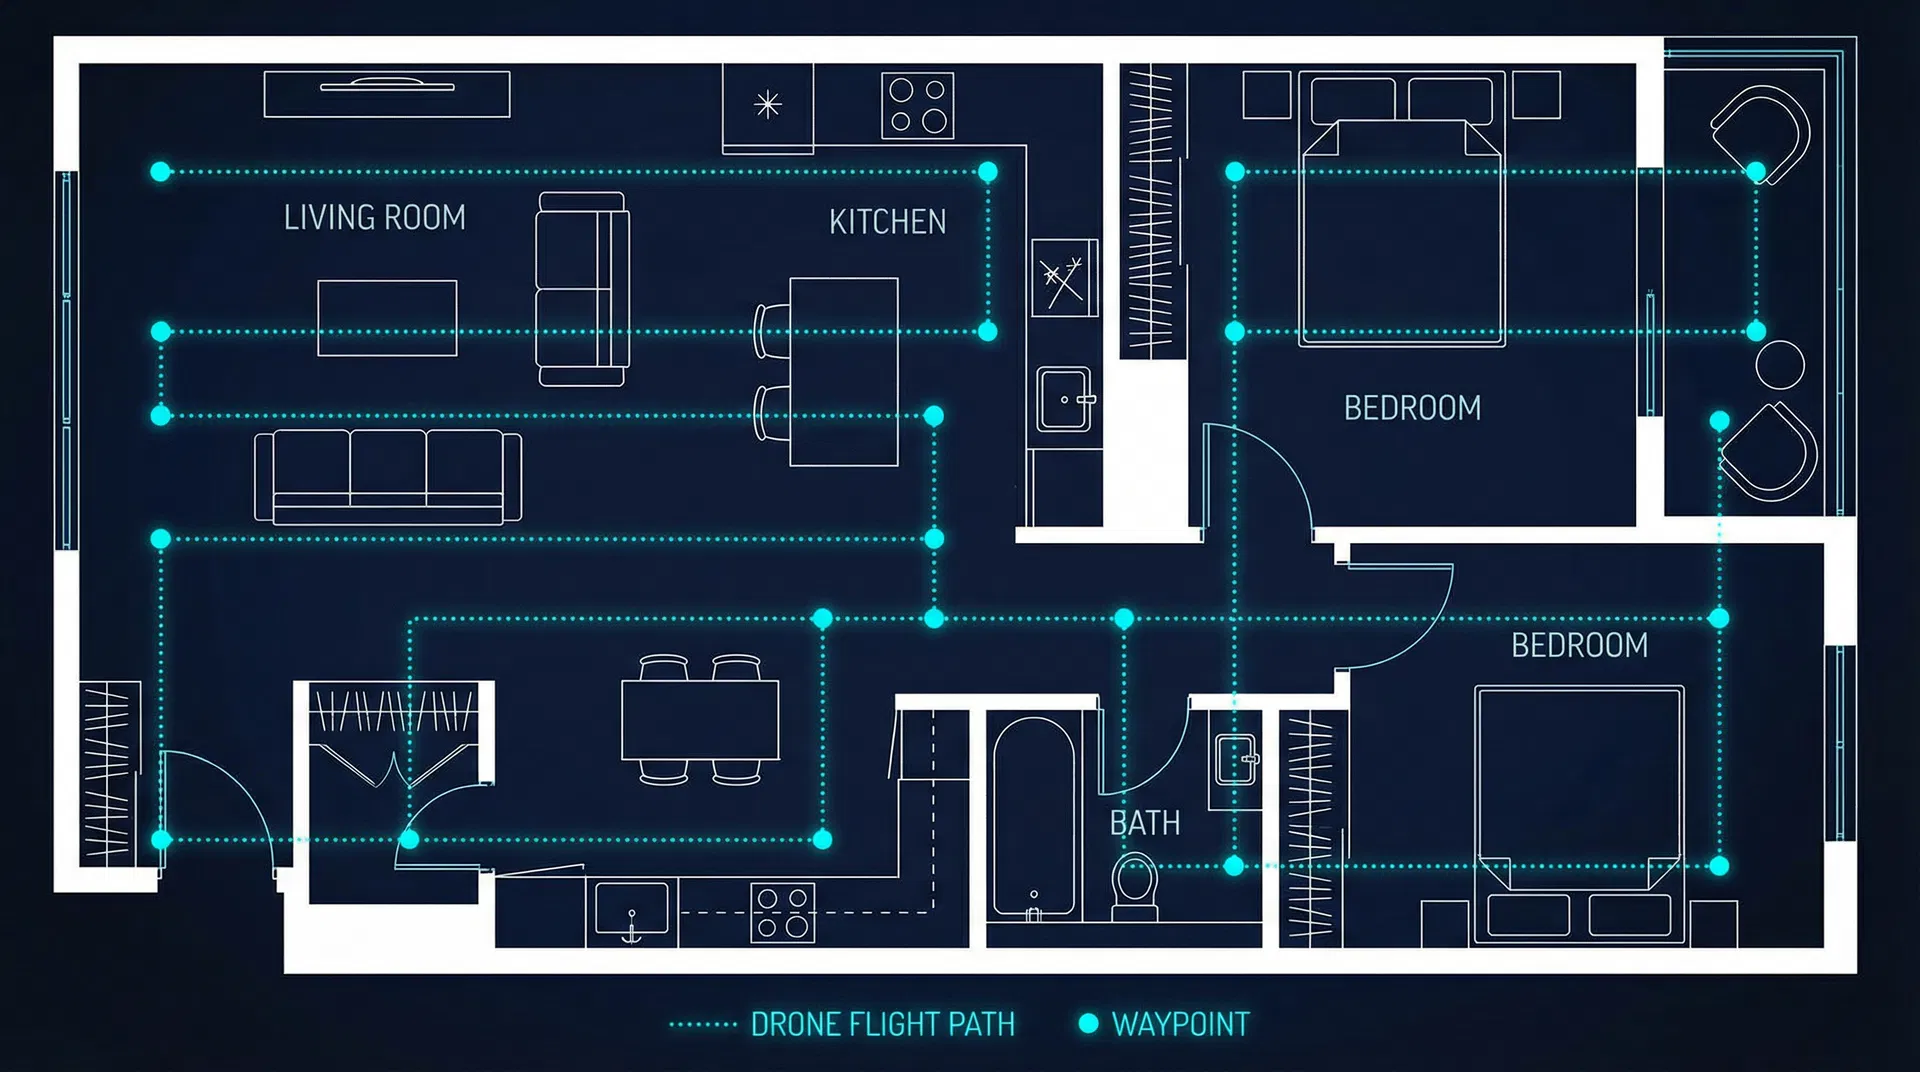
16 waypoints | 1.5m altitude | 70% image overlap | Grid pattern for maximum coverage
The Actual Code
These are the real code snippets your team needs to implement. Copy, adapt, and integrate.
# openclaw_tools/scan_room.py
from openclaw import Tool, Parameter

class ScanRoomTool(Tool):
    name = "scan_room"
    description = "Trigger drone to scan a room"
    parameters = [
        Parameter("room", str, "Room to scan"),
        Parameter("purpose", str, "Purpose of scan"),
    ]

    def execute(self, room: str, purpose: str):
        # 1. Validate drone status
        drone = DroneController.get_status()
        if drone.battery < 30:
            return "Battery too low for scan"

        # 2. Select waypoint mission
        mission = WaypointPlanner.plan(
            room_type=room,
            altitude=1.5,
            overlap=0.7
        )

        # 3. Execute flight
        drone.execute_mission(mission)

        # 4. Process images
        point_cloud = Photogrammetry.process(
            images=drone.captured_images,
            engine="colmap"
        )

        # 5. Return viewer URL
        url = PointCloudServer.upload(point_cloud)
return f"3D model ready: {url}"# telegram_bridge.py
import telebot
from openclaw import OpenClawClient
bot = telebot.TeleBot(TELEGRAM_TOKEN)
claw = OpenClawClient(api_key=OPENCLAW_KEY)
@bot.message_handler(func=lambda m: True)
def handle_message(message):
# Forward to OpenClaw with ChatGPT
response = claw.chat(
message=message.text,
model="codex-5.1",
tools=["scan_room", "drone_status",
"export_model"]
)
bot.reply_to(message, response.text)
# If a 3D model was generated, send link
if response.has_attachment:
bot.send_message(
message.chat.id,
f"🏠 3D Model: {response.attachment_url}"
)#!/bin/bash
# process_scan.sh - COLMAP pipeline
INPUT_DIR="./captured_images"
OUTPUT_DIR="./3d_output"
# Step 1: Feature extraction
colmap feature_extractor \
--database_path $OUTPUT_DIR/db.db \
--image_path $INPUT_DIR \
--ImageReader.single_camera 1
# Step 2: Feature matching
colmap exhaustive_matcher \
--database_path $OUTPUT_DIR/db.db
# Step 3: Sparse reconstruction
colmap mapper \
--database_path $OUTPUT_DIR/db.db \
--image_path $INPUT_DIR \
--output_path $OUTPUT_DIR/sparse
# Step 4: Dense reconstruction
colmap image_undistorter \
--image_path $INPUT_DIR \
--input_path $OUTPUT_DIR/sparse/0 \
--output_path $OUTPUT_DIR/dense
colmap patch_match_stereo \
--workspace_path $OUTPUT_DIR/dense
# Step 5: Point cloud fusion
colmap stereo_fusion \
--workspace_path $OUTPUT_DIR/dense \
--output_path $OUTPUT_DIR/fused.ply
echo "Point cloud: $OUTPUT_DIR/fused.ply"What You Need
Hardware
Software
What Works vs. What is Simulated
WORKS IN THIS PROTOTYPE
The web dashboard, 3D point cloud viewer (Three.js), chat terminal with command parsing, drone telemetry simulation, and the full architecture documentation are all functional. The 3D viewer renders a real procedurally-generated point cloud that you can orbit and zoom.
SIMULATED FOR DEMO
The drone flight, image capture, and COLMAP processing are simulated. In a real deployment, the Telegram message would trigger an actual waypoint mission on the Mavic Air 1, real images would be processed through COLMAP, and the resulting .PLY file would be loaded into the viewer. The code snippets on this page show exactly how to wire that up.
TO MAKE IT REAL
Install COLMAP on a GPU machine. Set up the Telegram bot with OpenClaw. Program waypoints in Litchi for your specific space. Connect the image transfer pipeline (SD card to processing server). The architecture is production-ready; the simulation just needs to be swapped with real hardware calls.